
The “Tactical” Levergun: Refinishing and Suppressing a Marlin 336 .30-30
This is one of the last projects from my “old” shop; a bit of a long term one based on an idea I’ve always had.
Lever action rifles have always been fascinating to me. They offer a unique compact and rugged versatility, and a wide range of utility. I’ve wanted to take one and modernize it, but part of the dilemma is the destructive aspect of taking a gun that’s designed to be a useful work of art; gorgeous carved wood and polished metal, and cutting and refinishing on it.
Some time back my wife bought a classic Marlin 336 rifle. Relax, I didn’t do anything to it. This became her “mainstay” hunting rifle for when we get the opportunity to hunt deer. Before she got that rifle, I’d never had experience with the .30-30 round and it’s wide variety of loadings and offerings. While I’ve used a .308 Remington 700 as my hunting rifle for a number of years, I really became infatuated with her rifle. It’s lighter weight, has a more “lean” form factor, easier to load and unload, and of course is a little faster with a followup shot (not that I would ever need one, right? ;))
This gave me the idea to find a Marlin 336 that I wouldn’t feel bad about doing this gunsmithing work on. Aside from just being a fan of Marlin rifles in general, I particularly liked the 336 as a candidate for this project as it featured a loading gate (some lever action rifles based on older designs do not have the side loading gate) as well as a solid top receiver, ideal for mounting optics (Winchester 94s, for example, are top ejection and therefore not ideal for optics usage.) Additionally, a feature of the Marlin rifles that is bad for customers but slightly more ideal for tinkerers; Marlin went through (some say still is going through) a period of lower production standards and decreased quality control after they were purchased by the Freedom group. The firearms put out by the company after this change in ownership showed a distinct and tangible lack of finish detail and overall quality that the older rifles boast. This means that the one you buy off the shelf is not going to have the same beautiful wood and metal and super slick action that, say, my wife’s 70’s model has. This, and almost entirely this, are what ease my conscience over completely reworking and refinishing a rifle; it’s done without taking an otherwise beautiful gun out of the general population!
I found a youth model 336 at one of my local gun shops, the Youth models were only made during and after the acquisition by the freedom group (as best as I can tell) and this rifle was a good example of Marlin’s quality shift. While the rifle shot fine and was decently functional, the action was not as smooth, the finish on the metal was not as rich and obvious corners were cut in manufacturing. Rounded parts of the receiver and action that would be harder to machine-polish were simply bead blasted instead of hand polished, there were sharp edges abound all over the rifle, and the checkering was very crudely stamped into a cheap, lightweight wood. It had also clearly been dropped at least once as there were a couple of pretty remarkable gouges on the receiver. The upshot was, well, this meant I was able to purchase it cheaply, and also this was stuff I could fix in my conversion process.
The first thing to go were the stocks. I have no problem with wood stocks, but these just weren’t worth keeping. The cheap stamped checkering not only held dirt in but also showed dings a lot more easily. Finding polymer replacements was actually a bit difficult. The company “Champion” makes replacement stocks for the Marlin 336 but apparently only produces them in small cycles and it took me over a year of searching and waiting until they came into stock from Midway. The polymer stocks come entirely smooth, actually kind of slippery. I’m not normally one to have issue with this sort of thing, but it needed to be addressed. One manner of adding a very usable and possibly aggressive gripping texture to polymer furniture and grips is the act of “stippling”. Stippling displaces plastic into a form that increases its size and shape and gives it a a noticeably rough texture. A heated element of some sort (usually a wood burner or soldering iron) is used, and can be done in a wide variety of patterns. I went with a pretty basic pattern of just lightly poking the plastic, causing a very small crater to form, and repeating that over an area I patterned off. I had practiced on a piece of plastic before going at the stocks, and to be honest, it’s a surprisingly easy process! I had the stocks completely stippled in just a couple of hours, and I drilled a couple of 1/2″ holes to epoxy in some QD sling mounts, “flush cups”. I then gave the stocks a coating of Brownell’s Aluma-hyde II in “coyote.”
The next part of the project was getting the barrel threaded. Some time ago I made a .30 caliber suppressor, on a Form 1, and it was designed so that I can make a wide variety of adaptor mounts to fit it across, well, any firearm that fires a .30 projectile or smaller! The barrel had just barely enough meat to be threaded 9/16-24 and have a shoulder for the suppressor adaptor to tighten against, and there was just enough stick out in front of the magazine tube and front sight. It was like serendipity! At the time I was threading this, the lathe I had was a Grizzly Mini Lathe, 7×14″. A very small machine for this sort of operation to be sure, this remains as the largest project I’ve done on that little lathe and I’ll be honest, I was pushing it! I could fit the barrel of the rifle through the spindle of the headstock, since I was just working on the first .600″ of the muzzle anyway, but I needed to open up the spindle bore just a hair with a 13/16″ drill bit. This will probably void your warranty! Opening up the spindle bore gave me just enough space to get the barrel into the headstock so I could work on the muzzle. The rest of the story is relatively straight forward; I threaded the barrel using the single point method on the lathe and we got a perfect fitting 9/16-24 thread!
With the barrel threaded I made an adaptor for the 9/16-24 threads on the barrel to fit the angled shoulder and larger, custom threads that are in my .30 Suppressor.
The last big part of the process is a complete refinish of the metal! Using 80 grit Aluminum Oxide in a media blasting cabinet the surface of all the metal was brought down to bare and a perfectly smooth satin. This was done to the barrel, receiver, magazine tube, lever, and a couple other small parts. I also blasted an XS Sight Systems scout rail, another upgrade I thought was key in this rifle! The media blasting is a necessary step in preparing the metal for Cerakote. Cerakote is a baked on epoxy style coating with impregnated ceramics. It’s extremely tough and not difficult to apply in the home shop, in my experience. This, however, was once again the largest item I’d done and it was a little tricky. I could fit the rifle and mag tube and all the other parts in my kitchen’s oven (this process isn’t very aromatic and the smell quickly vacates…..plus it was a rental) but the distance to travel between where I was spraying and where the oven was, made the transfer a bit on the scary side. With some help getting everything from my “spray booth” to the kitchen’s oven, I managed to not smudge any of the cerakote before the baking process! 2 hours later, it was done and the rifle could be reassembled!
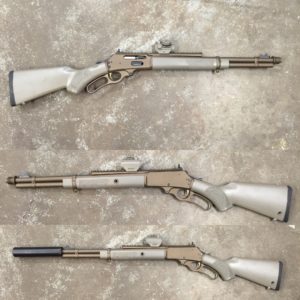
I’m very proud of how it all came out, and it ended up absolutely beautiful in my opinion! The color of Cerakote I used is called “Burnt Bronze” and it’s my new favorite.
I also loaded up some subsonic .30-30 loads using the powder “Trail Boss” which is superb for getting slow speeds!
With subsonic ammunition, the rifle is extremely quiet. It took a few months (moving interruption) before I could give it a full test fire, but comparing it to other firearms, with subsonic ammo, it’s about as loud as a .22 pistol with a suppressor. Yeah.
It’s an absolute joy to shoot, and I may go back “in” and do some more polishing and fine tuning of the action; it still has some parts that could be smoother.
If you’ve read this far, thank you for visiting my page! Patreon members who support me for as little as $1 per month get to see my videos early, as well as get access to monthly update VLogs, and in this case, patrons got to see the test fire video before anyone else!